This is a brief review of Xeoma from FelenaSoft, in addition to an installation guide.
The installation will be done on Red Hat Enterprise Linux 8, and I will show you how to install Xeoma step by step. I recommend a server installation without GUI. Assure your system is installed and up to date first. I do not recommend having anything else running on this server, it should be dedicated to this use. If Linux is not your preference, dont worry - they offer Microsoft Windows as an option too.
Review -
I have looked at Blue Iris, iSpy, Motion Eye, ZoneMinder, Shinobi, Milestone xProtect, Bluecherry, and some others. However, each of them seem to fall short in one way or another, such as Windows only, no Android app, or poor installation instructions.
Xeoma right off the bat has three strengths for when you are first installing and setting up the system:
- It is easy to install.
- It is quick and easy to add cameras.
- It is intuitive to configure the video recording process for each camera by the graphical module chaining feature.
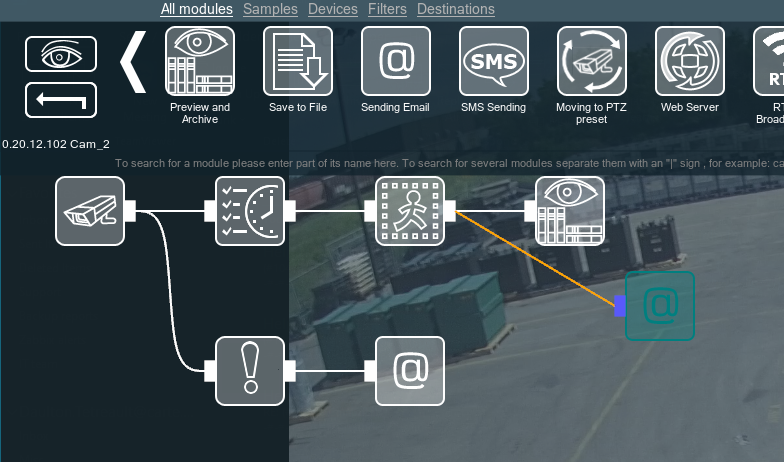
After using the graphical module chaining feature, I believe that this is a key feature of Xeoma so I will focus on showing that.
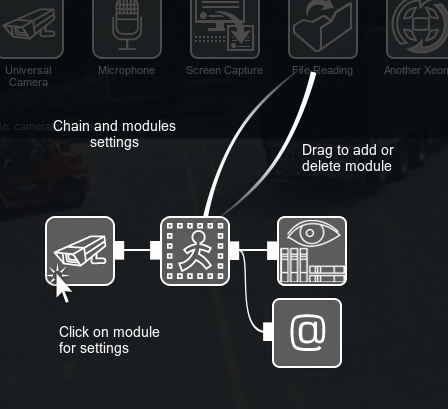
Here is an example of a module chain.
Configuration of each module can be done by clicking on it. The location of modules can be moved by clicking and dragging to better visually organize them.
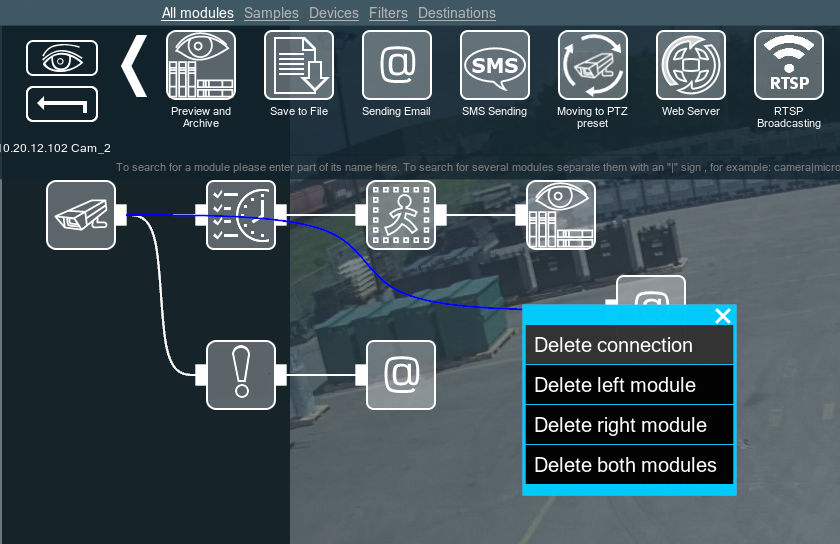
Operations such as deleting connections between modules can be done by clicking on the “cable” that goes between the modules.
To make a new connection to a different module, click either the source or destination white rectangle connector boxes, and drag the connector to where you want it to go.
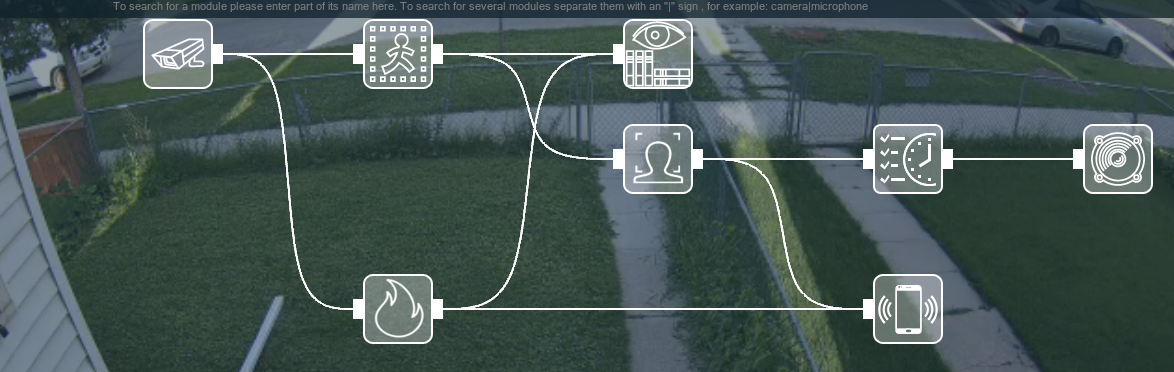
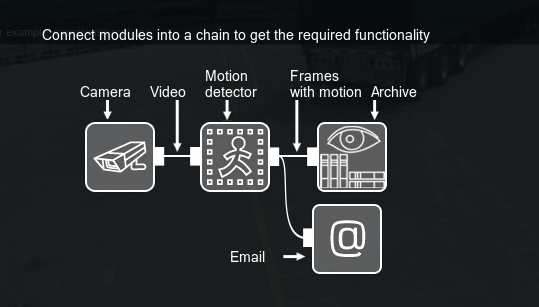
Here is a example of a more advanced module chain, it is fantastic what you can achieve! It will take a minute to explain what all of this does.
- First it starts with the camera, if there is motion then..
- Preview and archive the footage.
- If there is motion and it is NOT of a person that facial recognition is familiar with, AND the time is between a certain range such as night, THEN sound an alarm.
- If there is motion and it is NOT of a person that facial recognition is familiar with, then send an alert to the mobile app.
- If there is motion and it is smoke, send an alert to the mobile app.
- If there is a problem with the camera, or feed, etc., then send an alert to the mobile app.
As you can see you can achieve very powerful and practical setups graphically, and you can fine-tune the parameters of each module so it works for your requirements.
Installation -
Note: Either add sudo in front of each command, or change to the root user, when issuing these commands.
- We need to disable SELinux, first we will issue the command to do immediately but also we need to permanently set it to either permissive or disabled.
setenforce 0
-
Edit /etc/selinux/config and change
SELINUX=either to permissive or disabled. -
Download the installer. Note you may need to install wget, to do so do:
dnf install wget
wget https://felenasoft.com/xeoma/downloads/latest/linux/xeoma_linux64.tgz
- Extract the archive.
tar -xvzf xeoma_linux64.tgz
- Install the server component of Xeoma. Assure to document the password the installer generates.
./xeoma.app -install -coreauto
- If we go by the official documentation, you are done. However in most administrators eyes this is not good because the service runs as root by default. We are going to change that so it runs as a low privilege service user. First let us start by creating a service user.
adduser --system --shell=/sbin/nologin --no-create-home _xeoma
- Move the Xeoma binary to a standardized location.
mv bin/Xeoma/ /usr/local/bin/
- Set the ownership of necessary directories to the new service user.
chown -R _xeoma /usr/local/bin/Xeoma
chown -R _xeoma /usr/local/Xeoma
mkdir -p /usr/local/Pictures && chown -R _xeoma /usr/local/Pictures
- Set an ACL on each of the directories so new files get created with the correct ownership.
setfacl -Rdm u:_xeoma:rwx /usr/local/Xeoma/
setfacl -Rdm u:_xeoma:rwx /usr/local/Pictures
- Edit /etc/systemd/system/XeomaCoreService.service and replace all of the existing file contents with the following. Open the config with Nano, or your preferred editor.
nano /etc/systemd/system/XeomaCoreService.service
New file contents:
[Unit]
Description=XeomaCore
After=syslog.target

[Service]
Type=simple
User=_xeoma
PIDFile=/run/XeomaCore.pid
ExecStart=/usr/local/bin/Xeoma/xeoma -service -startdelay 10
Restart=always
KillMode=process

[Install]
WantedBy=multi-user.target
- Since we changed the service file and moved important Xeoma files around, we need to tell systemd to reload the changes and then restart the Xeoma service.
systemctl daemon-reload
systemctl restart XeomaCoreService.service
- Assure the service is running. You should see in the output
Active: active (running).
systemctl status XeomaCoreService.service
- Open the needed firewall port so the client software can access the server. If this a public server, I strongly recommend going further and restricting access by VPN only or open the port to a particular public IP only.
firewall-cmd --permanent --zone=public --add-port=8090/tcp
firewall-cmd --reload
Reference example setup of restriction via subnet or IP (Can be private or public). If you dont know, just use the above commands instead.
firewall-cmd --new-zone=xeoma-access --permanent
firewall-cmd --zone=xeoma-access --add-source=10.24.96.5/20 --permanent
firewall-cmd --zone=xeoma-access --add-port=8090/tcp --permanent
firewall-cmd --reload
Note: In the above example, if you want only one IP address to have access - in the add-source statement change this to the companies public IP that is allowed access and change the subnet to /32. For example 184.100.22.141/32.
- Install completed!
Notes -
- “FTP Receiver” module, use a different port than 21 such as 2121 as program is not running as root and cannot bind to a privileged port.
- “Preview and Archive” and “Save to File”, if using archive locations other than the default you must change the ownership of that file path as well. Reference step 8 for how to do this.